
EV3 Gyro Boy epitese: önállóan egyensúlyozó LEGO MINDSTORMS EV3 robot részletes útmutató
This tutorial will show you how to build and program a self-balancing LEGO MINDSTORMS EV3 robot that can drive around a room. You can build and program BALANC3R (left) or Gyro Boy (right).
Before you run the programs, let’s briefly examine how they work. The configuration blocks let you specify what the robot looks like, so that the robot knows how to balance.
For example, the second setting of the first setting specifies the diameter of the robot’s wheels. The example programs come preconfigured with the correct settings for BALANC3R and Gyro Boy if you use the LEGO EV3 Gyro Sensor.
A miért és hogyan működik az egyensúlyozás?
The balance loop keeps the robot balanced. It measures and calculates the position and speed of the motors, and it determines the robot’s angular velocity (how fast it’s falling), as well as the robot’s angle relative to the ground.
In turn, it uses this sensor information to calculate how to drive the motors in order to keep the robot up right. The drive control loop controls the speed and steering of the robot as it drives around a room using a simplified move block.
Előkészületek és első indítás
Hold the robot upright with its wheels on the ground. You’ll first hear one beep. You’ll then hear a double beep. If it doesn’t work on the first try, repeat the steps above a few times. Do not try to “help” the robot balance.
The two Large motors should be connected to ports A and D. (If you’ve accidentally interchanged them, that’s fine. If you’ve successfully programmed your robot in the previous step, it’s easy to try out the other example program for your robot.
Programok és protokollok
BALANC3R-RemoteControl lets you control BALANC3R with the infrared remote, as shown in the video above. Just press the buttons on the remote to make the robot drive forward, backward, and turn.
GyroBoy-AvoidObstacles makes Gyro Boy drive around a room while backing up from obstacles, as shown in the video above.
Before you run the program, make sure that the white beams of both the robot’s arms point downward. As you’ve learned earlier, the balance loop keeps the robot balanced while the drive control loop controls the robot’s speed and steering.
A mozgás és a blokkok
The two loops run simultaneously, or at the same time. The Move block makes the robot drive and steer. The robot keeps driving or turning at the specified rate until you run the block again with different values for speed and steering.
The figure below shows the Move My Block in action in the basic example program you ran in step 4. The first Move block sets both steering and speed to 0, which makes the robot balance in place without turning. Next, a Wait block pauses the loop for 7 seconds, keeping the robot in the same place. Then, a second Move block sets the steering value to 20, making the robot turn to the right.

Fejlesztés és gyakorlati gyakorlatok
Now that you’ve learned how to control the robot, it’s time to put your skills to the test with programming challenges. To solve these challenges, you can use the techniques from the LEGO MINDSTORMS EV3 Discovery Book, presented throughout chapters 1-9.
Make your robot follow the Infrared Beacon. Attach the Color Sensor in front of the robot’s wheels, and make the robot follow a line. Make your robot drive in different directions based on the color it detects with the Color Sensor. To accomplish this, make the robot wait for the sensor to see either a yellow, red, green, or blue object. Make your robot show different types of faces/eyes on the screen as you interact with its sensors.
Algoritmikus megfontolások
In the previous steps, you’ve made BALANC3R or Gyro Boy balance on two wheels, and you learned to control it with the Move My Block. Now that you’ve got the essential components working, you’re ready to customize both your robot and your program.
For example, you can turn BALANC3R into a life-like humanoid with arms, and make it talk to you. Or, go crazy and make any EV3 vehicle balance on its rear wheels. What about a self-balancing F1 style race car?
Whatever you make, let others know in the comments below. In order to make this tutorial accessible for everyone with an EV3 set, I didn’t cover the details of the balancing algorithm. However, many papers have been written about self-balancing robots, and I encourage you to read more on the subject as you explore the details of the EV3 program provided on this page.
Fontos háttérinformációk és források
The balancing algorithm in this program is based on a Bachelor thesis written by Steven Witzand, which provides a good overview of the subject, along with Java source code that implements the balancing algorithm.
When a robot is not balanced, or the map is not even, or it is moving over a field model, it may be tilted to one direction and cannot stay moving straight. In these cases, we can use a Gyro Sensor to guide our robot in moving straight forward. Also, if our robot needs to move long distance, say three feet, we will use Gyro Move Straight also.
LEGO MINDSTORMS EV3 Egyensúlyozó robotok: BALANC3R és Gyro Boy
Készítés és tanulás a saját sokszínű robotokról
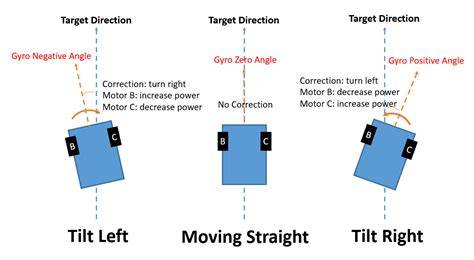
In this post, we will show you how to program a robot to move in a straight line using a Gyro Sensor. For example, for FLL City Shaper Black Circle mission, our load is on the left side of the robot. Without Gyro guiding, our robot will tilt to the left. The following picture show the three possible ways when a robot moves forward.
- Robot moves straight and there is no need for correction.
- Robot tilts to the left. You want to turn your robot to the right by increasing the Motor B power and decreasing the Motor C power.
- Robot tilts to the right. We can use a Gyro Sensor to measure angle. If the Gyro’s angle measurement is negative, our robot is tilting to the left. If the Gyro’s angle measurement is positive, our robot is tilting to the right.
Furthermore, the bigger the angle deviation, the more the power adjustment. This is called the proportional adjustment. As such, the power adjustment can be calculated as the following: Power Adjustment = Kp * Angle Deviation. Where Kp is the proportional constant. It should be tuned for every robot. The bigger Kp, the higher will be the turning when there is an error. For our robot, we used -0.8 as the proportional constant.
The following is the EV3 Gyro Move Straight Program based on above description. The MyCheckDistance My Block is described in our previous post. Unregulated Motor Block is used for driving the robot. The Unregulated Motor block does not include automatic motor control, like the normal Medium Motor block and the Large Motor block. This means that no automatic regulation on motor power will be included.
To make the blocks in the Loop block reusable, we can create a EV3 Gyro Move Straight My Block. At last, connect all the Parameters. The following program uses the EV3 Move Straight Gyro My Block we just created.
Oktatási és személyes meglátások
Learning to build and program with LEGO® Education Mindstorms EV3 has been of such TREMENDOUS benefit to my son (now 11). His LEGO obsession goes back many years, and it has been such fun chronicling it and providing LEGO learning materials here at Homegrown Learners. I get so many questions about what Mindstorms are and HOW to get started with them.
This is the first in a series of posts about robots my son is building, resources he is using, and simple tips for successful building. First, if you'd like an OVERVIEW of Mindstorms, read LEGO Mindstorms EV3 in Your Homeschool, then come back here. This post does not contain any information about First LEGO League. We are simply learning about EV3 and having fun right now.
Keep in mind all of our building is done with the EV3 set through LEGO® Education -- NOT the retail set. The retail set targets home users and the education set targets educational users. LEGO® Education Mindstorms EV3 Building Instructions are within the software, and we have also found instructions online at Robot Square.
If your LEGO lover hasn't done a lot of building with Technic blocks, I would recommend letting them build some of the robots first and not even worry about the programming. My son has built some of the robots multiple times, just because he enjoys building. I let my son borrow my iPad to view the instructions.
A note about set storage: We use the container the sets come in, as well as a tackle box to organize the smaller parts. We own both the Core and Expansion sets, so there are a lot of pieces. A note about the price: Yes, these sets are pricey. Yes, they are investment. Yes, they are WORTH it if you have a child who loves robotics and learns from them.
LEGO MINDSTORMS EV3 Egyensúlyozó robotok: BALANC3R és Gyro Boy
Speciális technikai megjegyzések és összefoglaló adatok
The Gyro Sensor and balance loop are essential for maintaining straight motion and correcting tilt. Gyro Move Straight is used for longer distances, while Keep balanced behavior relies on proportional power adjustments. The balance and drive loops run concurrently to achieve stable locomotion while navigating around obstacles and following sensor cues.
Kiegészítő adatok
Robotok és programok testreszabása mindenkor lehetséges, és a közösség hozzászólásaiban megoszthatók az élmények. A színek és követéses feladatok gyakorlásához többféle szenzor kerül felhasználásra, például Color Sensor és Infrared Beacon.
tags: #ev3 #gyro #boy #epitese